Showing posts with label creations. Show all posts

Thursday, October 14, 2010

Recent Randomness

Gotta visit the blog more often! FaceBook occupies too much of my time. It's a travesty. Wonder if that new movie The Social Network is any good? Anyway, I digress.

Really enjoying my new job at the bakery, but my hours are sporadic at best. I'm either working every day, or hardly at all. Hoping that once they hire me in full-time (fingers crossed), they'll give me regular hours. For now, just know I can't commit to anything more than, like, 12 hours in advance.

Our baby niece was born Sunday, October 3rd (just one week before 10-10-10, dangit!)! We just love her...she's SO adorable! Welcome to the family, Aliyah, and congrats to Vikki & AJ and big brother Elijah!


Just celebrated 14 years of wedded bliss with my wonderful hubby! And speaking of marriage, I got to attend the wedding of one of my best friends yesterday. Congrats to Shyla and Jeff! May the state of matrimony be good to you both.


Managed to find some time to scrap a few pictures...really enjoying all this creative time! SO glad to be able to participate over at Tally again, and I'm thinking of applying for a DT spot at another kit club this week. Wish me luck!


Tuesday, September 28, 2010

Scrappin' Again...

...and it feels so goooood!! Not sure how long it's been really since I've scrapbooked with any sort of regularity, but it seems like forever. I decided I'd been away from Tally for too long, joined in with some of their challenges, and finally my scrapping slump seems to be over! Which is a good thing...I've got a crapload of pictures looking for a home in my album. A. Crap. Load.

Here are my recent layouts. Looking forward to creating many more in the coooold months to come. If there's one thing winter's good for, it's staying inside to create!


Wednesday, June 16, 2010

New Gutter Girlz Prompt is UP!!

And I'm so proud of myself for putting my procrastination aside (for once) and getting the Gutter Girlz challenge DONE!! Uploaded it on time, and everything. You can find the new prompt HERE!

Come play along in the Gutter with us!

Sunday, May 30, 2010

New Art Journal Pages!

When my computer died over a month ago, I needed to find something to fill the aching hole it left in my heart. Rick's laptop just wasn't the same, with its touchpad mouse and its Internet Explorer. So I turned to my art journal, sometimes creating 4 pages in a single day. Thankfully, I was almost a year behind on the prompts from A Year in the Life of an Art Journal, so I had a lot to keep me busy.

Now I've grown much more attached to Rick's laptop, having downloaded both Picasa and Firefox to his hard drive (easy to remove once I get a computer or laptop to call my own) to make the adjustment bearable. I've also figured out how to upload new pictures, and all I have left to learn is how to access our scanner without my poor deceased desktop PC. I'm sure I can do it, I only lack the motivation to teach myself at the moment. (I inherited my procrastination from my father, and my ability to blame other people for my shortcomings from my mother. It's a nice balance.)

So until then, here are a few of the art journal pages I completed during my time of transition, photographed instead of scanned, for your viewing pleasure. These are my favorites...you can see the rest on my Flickr page. Hope you have a great Memorial Day! :)


Thursday, April 8, 2010

Make Your Own Upcycled Pocket Journal!

Here's a step-by-step photo tutorial on how to use thrifted and recyclable items to make a pocket-sized upcycled journal! Maggie and I made these for her school's Market Day, and they were a huge hit. Let's get started!

Supply List:
empty box for cover (postcard weight works best, cereal boxes are a little thick but still usable)
Contact paper (at least a 5x7 inch scrap)
scrap patterned paper for inside cover
adhesive (not pictured)
embroidery floss
needle
hammer & awl
bone folder (not pictured)
embossing tool with narrow end for scoring (the round end of a paint brush would work)
hobby knife
ruler
scissors (not pictured)
junk mail or other blank scrap paper (I got most of mine from old journals I found at Goodwill)

First, use your ruler and hobby knife to cut a 4 1/4 x 6 1/4 inch rectangle for the cover. (All scrap materials from this project were recycled!)
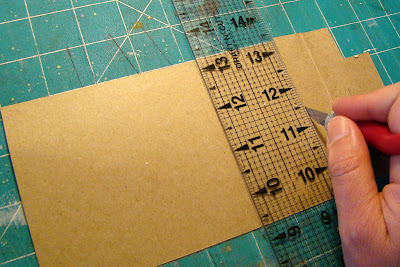
Using your cover piece as a guide, cut a piece from your sheet of Contact paper about 1/2 inch larger on all four sides.

Gradually peel off paper backing from the Contact paper, applying the cardboard piece blank side down (to avoid having any print show through). Cut the corners as shown and fold over edges.

Cut a 4x6 inch rectangle from your patterned scrap paper and adhere to the inside of your cover.

Using your ruler and scoring tool, impress a line 3 inches in from each side of the 6 1/4 inch length. Fold on each score line and use your bone folder to create a clean fold. Don't press too hard during this step, or you may tear your paper!

You should have a nice, crisp 1/4 inch binding like so:

Next, cut your blank (or lined, or both) scrap papers to 4x6 inches. Stack together and fold in half, using your bone folder to make a sharp crease. You should be left with a 4x3 inch booklet (called a signature). Save one page (called a folio) to use as your signature-punching template.

Making sure the pages are tightly together, use your ruler and hobby knife to trim the outside edge of your signature to eliminate the fore-edge creep.

Using your ruler and the awl, mark your template on the crease, once in the middle (2 inches in from either side) and 1/2 inch from the top and bottom.

Place the template inside your signature and using it as a guide, press the awl through all the pages, tapping with the hammer. When marking the cover, make sure your guide is in the middle of the binding, not aligned with the top or bottom. (I make a small mark with the awl, remove the template, then make the hole larger with the awl after assuring the hole will be in the middle of the binding, not close to one of my score lines.)


Align your signature inside your cover. Cut the embroidery floss to an 18-inch length, then separate into 2 or 3 strands. Thread your needle with the strands and enter the middle hole from the inside, making sure to leave about a 4 inch tail.

Enter through the top hole, then again go through the middle hole to the outside, keeping your thread snug.

Enter through the bottom hole, then pass your needle underneath the binding stitch inside the book.

Tie your loose ends in a double knot, then trim to about 1/4 inch.

This is what the outside of your booklet will look like (I used dark thread so it would be easier to see for this tutorial, but you could use whatever color you like):

The inside:

You can affix a label or other decoration to the outside to personalize your notebook, and you've made your very own upcycled pocket journal! Congratulations, excellent work!

Thanks for following along with my tutorial...and if you decide this project doesn't seem like something you'll have time for, I'm sure I'll have some available in my etsy store soon. Have a fabulous weekend!

Wednesday, April 7, 2010

An Update & A Recipe!

Okay, I'll admit that my New Year's goal of blogging once a week hasn't been on-target so far. Not by a long shot, actually. BUT, I'm halfway through book #26 of the year, so making my goal of reading 100 books in 2010 seems like a good possibility. AND I've been putting my creative muse to work, most recently with these silly sock creatures! Aren't they cute?

The little blue guy is Mr. X, and he's Jacob's new buddy. The rainbow guy is Rupert, made especially for the baby girl my sister Kim is expecting any day now! He has fully attached felt eyes instead of button eyes, so he'll be safe for lots of slobbery baby kisses.

Maggie's finally done with her 6-week Girl Scout program (thank GOD!) and got her patches a few weeks ago. I'll be using them on a scrapbook page, since she won't be a Brownie after this year, even if she decides she still wants to be a Girl Scout.


And in other news, I attended the Spring Children's Clothing Sale with my sisters-in-law a couple of Saturdays ago. The sale started at 8am, but we were there at 4am so we could be first in line! Yeah, we're totally crazy. This event is a big deal...HUGE crowds every time! We were almost too frozen in this picture to smile...looking forward to the warmth of the fall sale in August!

Scored some really great baby clothes for my as-yet-unborn niece along with a ton of other stuff! And I only spent $51.25. Not a bad day's work, and totally worth the wait!


And now I shall share with you one of my family's most favoritest recipes...baked spaghetti! It's a crowd pleaser...serves our family of 6 with plenty of leftovers. Making it requires dirtying a lot of dishes, but the end result is soooo worth it! Invite some friends over and serve this casserole with garlic rolls and salad...they'll be singing your praises, I guarantee!
Guarantee not valid if you, by your own ineptitude, manage to screw this up. :)

Baked Spaghetti
1 lb. ground beef
1 lb. Italian sausage
3 cloves garlic, minced
1 onion, diced
1 green pepper, diced
1 28oz can petite diced tomatoes, undrained
1 small can mushroom stems & pieces, drained
1 small can sliced black olives, drained
Italian seasoning
salt & pepper
2 c. shredded mozzarella or cheddar cheese
1 can cream of mushroom soup
1/2 c. water
1/4 c. grated Parmesan cheese
12-16 oz spaghetti
***************************************************
Preheat oven to 350 degrees F. In large pot, put water on to boil for spaghetti. In a separate large pot, brown beef and sausage with garlic, green pepper and onion until done. Add tomatoes, mushrooms, olives and seasonings, bring to a boil and simmer over low heat 10 mins. Meanwhile, cook spaghetti according to package directions; drain. In a large, greased casserole dish, spread 1 cup meat mixture. Then layer 1/2 spaghetti noodles, 1/2 remaining meat mixture, 1/2 shredded cheese. Repeat layers. In a small bowl, mix mushroom soup with water; pour over casserole. Top with Parmesan cheese. Bake for 25-30 minutes. Enjoy!

Saturday, March 13, 2010

Recent Scrapiness...

Seriously, I DO have more to blog about than just my recent art projects. Really! But to avoid putting it all in one post and possibly subjecting anyone to blog overload, I'm going to eeeeeaaase you into it, real sloooow like.

First, scrappy layouts! Some of these were started months ago, but only needed some finishing touches, like a title and journaling. So proud of myself for finally getting them ALL the way done! A few others were completed at a scrappy event I went to with Shyla on the 1st weekend in March. That was such a great time! Miranda and her friend Jamie were there, and it was hosted by Connie, the mother-in-law of the amazing Kristy Caldwell. Fun, fun! Can't wait to go back in May and see my girls again!

This first one was made using the January kit from Jen's House of Scrap!


Just discovered tons and tons of pics on the memory card Rick's been using in his karaoke machine...guess what I'll be doing this weekend? :) Hope yours is a great one!

Saturday, February 27, 2010

Art Journaling Once Again...

...and it feels so good! I finally did the first 3 prompts from A Year in the Life of an Art Journal blog (run by my bestest good friend Rachel), and now I'm inspired to complete the prompts I missed last year. There's just something so freeing about slopping paint onto a page...makes me happy!

And sometimes, when I get a little too inspired, I end up accidentally creating a new paint shirt. Totally worth it.


Wednesday, February 24, 2010

Notice Anything Missing...

...from this sad, lonely parking spot in front of our apartment?

If you guessed a vehicle (or more specifically, my VAN) then you are correct! Sadly, my van decided that since we weren't planning to spend any of our tax return money on a nice gift for it, well then it would just drop it's transmission out on the highway so we'd have to get it a new one. Nice, huh? But the joke's on the van...we aren't getting it a new one, we're just having the old one rebuilt! Heh heh. That vehicle just doesn't understand the human smartness it's dealing with here.

So anyways, I'm kinda stuck at the house until we can manage to pick it up later this week. Not that I had plans to go anywhere, luckily.

How about a 2010 Goals recap:
1) BLOG at least ONCE a WEEK.
Um...still doing better than last year. I consider this a win.
2) Be in a size 8 (or a 6...hey, it could happen!) by the end of the year.
My weight seems to be staying the same, which is frustrating, but I'm still exercising 5 days a week. And I now need smaller underpants, so something must be working!
3) Edit and organize my pics from this year and last, and get them on Flickr.
Yesterday I edited our Christmas photos (better late than never, right?), plus a ton of other pics, and finally uploaded them. Whew!
4) Read 100 books.
I'm halfway through book #15...not exactly on target, but I should at least hit 50 by the end of the year!
5) Get back into my art again!
I've scrapped several pages this year using the January kit from Jen's House of Scrap...I even did this month's prompt for GutterGirlz! And here's my proof:


I've also managed to make 2 etsy sales so far this year, and my robot pinback buttons are being reviewed soon on THIS BLOG...pretty excited about that. :) Hope your Wednesday is happy!
Related Posts with Thumbnails